

How To Remove Stuck Oil Drain Plug
How to Remove a Stuck Cleanout Plug
Updated: November. 25, 2019
How to remove a stuck cleanout plug to get at a clog in a bleed pipe
A seasoned pro shows you how to remove a stuck cleanout plug to gain access to a stubborn clog in a bleed line using pipe wrenches, heat and/or a hacksaw.
You might too similar: TBD
Overview: Remove a stuck cleanout plug
Snaking a clog in a drain line isn't exactly neurosurgery. Just remove the cleanout plug and ram the snake down the line. Just what if you can't remove the plug?
"I run into rusted-in cleanout plugs a lot in older homes with galvanized pipe," says master plumber Les Zell. He recommends investing no more than 30 minutes trying to free one. After that, go to Plan B: Cut out a whole section of pipe and supervene upon information technology with new plastic piping rather than beat yourself up and possibly suspension fittings.
"Information technology's much cheaper for my customers if I just hack out the old stuff rather than struggle with rusted connections for two hours," Les says.
Run across Our Cleanout Plug Removal Expert: Les Zell
Les Zell has been a principal plumber for 25 years and runs his ain plumbing business organisation. His passion is solar heating.
Plumber "humor"
"My best advice for removing a stuck cleanout plug is to apply liberal amounts of rust penetrant to the stuck cleanout fitting at least one month before the line clogs up."
Step 1: Remove the cleanout plug with finesse and force

Photograph one: Estrus the cleanout plug and fitting
Clean away any cobwebs, and shield surrounding wood with a metal blistering pan. Grab a soldering torch and utilise just enough heat to warm the cleanout plug and plumbing fixtures. Don't go it cherry scarlet.

Photograph two: Utilise rust penetrant and vibration
Soak the cleanout plug threads with rust penetrant. Then smack contrary sides of the tee or wye fitting at the same time using two hammers. Rotate the double blows around the entire plumbing equipment. Then attempt using a piping wrench again.

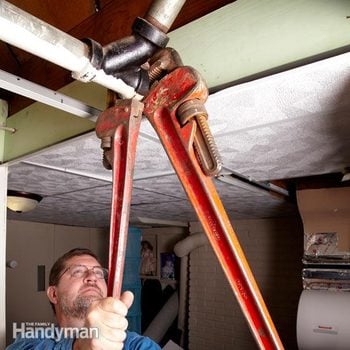
Photo three: Apply musculus and leverage
Slip one piping wrench onto the fitting and the 2d i on the cleanout plug. Then give it all you lot've got. If the plug breaks loose, y'all're home free.
Start cleanout plug removal by applying gentle rut to the cleanout plug and fitting to soften the old pipe dope (Photo 1). If that doesn't piece of work, expect for the pipe to cool, apply rust penetrant, and then use double hammer blows around the fitting (Photograph 2). The vibrations from the shocks suspension up the corrosion and allow the rust penetrant to do its work. If the plug unscrews, become ahead and ophidian the line. Just don't reuse the metal plug. Buy a plastic plug and coat the threads with Teflon paste before installing. And then snug it up with a skid joint pliers (not the pipe wrench).
Step 2: Remove the cleanout plug with a hacksaw

Photo four: Cut out the one-time section
Utilize a reciprocating saw and a metal-cut blade to cut out the fittings and the pipe leading to and from the cleanout wye or tee.

Photo 5: Supersede the cleanout plug and fitting
Slide the mission couplings onto the old pipe and slip in the new plastic fitting and repair couplings. Tighten the worm-bulldoze clamps. Then wrap Teflon record effectually the new plug and spiral it into the adapter.
If the stuck cleanout plug won't budge, saw off the old section (Photograph 4) and supervene upon it with new parts. Once it'southward free, utilize the old fitting every bit a cut guide to glue up a replacement wye, stub pipes and a new cleanout adapter (Photo 5). Don't mess around with steel replacement parts. Become right to black ABS or white PVC plastic fittings and pipes and bring together them with prophylactic mission couplings. Slide both couplers onto the sometime pipe. Hold the new pipe in place and slide the vertical coupler into place and snug it up. Then connect the horizontal coupler. Tighten both to the proper torque.
Les'due south Cut Tip
Saw through the horizontal pipage, but go out about 1/4 in. of the pipe uncut. Then saw off the vertical pipe. The horizontal "tab" prevents the vertical pipe from wiggling while you saw. And so terminate the cut on the horizontal pipe.
Required Tools for this Project
Have the necessary tools for this DIY project lined upwardly before you outset—you lot'll relieve time and frustration.
Keep a fire extinguisher handy.
Required Materials for this Project
Avoid last-minute shopping trips by having all your materials prepare ahead of fourth dimension. Hither'southward a listing.
Originally Published: November 25, 2019
Source: https://www.familyhandyman.com/project/how-to-remove-a-stuck-cleanout-plug/
0 Response to "How To Remove Stuck Oil Drain Plug"
Post a Comment